How to Replace Canopy on Cantilever Umbrella? (Answered!)
So, you’re faced with the task of replacing your cantilever umbrella canopy. While it may seem challenging, I have some tips to help you through the process smoothly.
Stay tuned to learn how to swap out your canopy and give your outdoor space a fresh look.
Let’s make this canopy replacement a breeze together.
Continue Reading to Understand These Key Points:
- Proper measurements ensure a perfect fit for the new canopy.
- Gather necessary tools like a screwdriver for efficient replacement.
- Carefully remove the existing canopy by unfastening all anchor points.
- Cleaning the ribs and frame before replacement maintains umbrella integrity.
Reasons for Canopy Replacement
When considering the replacement of a canopy on a cantilever umbrella, it’s essential to understand the reasons that may necessitate this maintenance task. The old canopy might show signs of wear and tear such as fading, ripping, or the ribs losing canvas.
These issues compromise the functionality and aesthetic appeal of the umbrella. By replacing the canopy, one can opt for a different color or design, enhancing the umbrella’s appearance and giving it a fresh look.
Changing the canopy is a cost-effective solution compared to purchasing a new umbrella. It allows you to enjoy a renewed canopy at a fraction of the cost.
Ensuring the correct size of the replacement parasol canopy is crucial for a proper fit and maintaining functionality. Replacing the canopy is a quick and efficient way to refresh the look of your cantilever umbrella, extending its lifespan and usability.
Canopy Replacement Preparation
First, make sure to gather all the necessary tools like a measuring tape and a screwdriver. Then accurately measure the dimensions of the canopy to ensure the replacement fits perfectly.
It’s crucial to have the correct measurements to avoid any issues during the replacement process.
Gather Necessary Tools
To prepare for replacing the canopy on a cantilever umbrella, gather essential tools like a screwdriver and a ladder. Check for anchor points secured with screws to ensure a smooth removal process without causing damage.
Look for reinforced anchor points near the primary arms for added stability.
Identify velcro connections, pockets, and zipper closures for easy detachment. Before starting, inspect the canopy thoroughly to locate any velcro connections or zipper closures holding it in place.
Having the necessary tools and understanding the canopy’s attachment points will streamline the process of removing the old canopy efficiently and safely.
Measure Canopy Dimensions
When preparing to replace your umbrella canopy, accurate measurements are crucial for ordering the correct size.
Here are key steps to measure the canopy dimensions effectively:
- Measure the diameter of the umbrella canopy.
- Count the ribs on the umbrella to match with the replacement canopy.
- Note the air vent placement for proper alignment.
- Ensure precise measurements to avoid issues during replacement.
Following these steps will help you order the right replacement canopy, avoiding the need for returns or adjustments.
Measuring Canopy Diameter and Ribs
When selecting a replacement canopy for a cantilever umbrella, it’s vital to accurately measure the canopy diameter and count the ribs for a proper fit.
Measure the canopy diameter by extending a tape measure across the center. Count the ribs, which are the support arms extending from the center pole to the canopy edges.
Matching these measurements ensures a snug and secure fit for the replacement canopy, making the process smoother and more successful.
Removing Existing Canopy
First things first, to remove the existing canopy efficiently, it’s crucial to identify the anchor points secured with screws. These anchor points near the primary arms need to be located for a successful detachment of the old canopy.
Now carefully unzip the zipper at the top of the canopy and disconnect all velcro connections before proceeding with the removal process.
Canopy Removal Tools
To detach the existing canopy from the cantilever umbrella, use a screwdriver to carefully remove it, checking for anchor points secured with screws for safety.
Tools needed for the process include:
- Screwdriver: Unscrews anchor points.
- Pliers: Grips and removes stubborn screws.
- Scissors: Cuts threads or cords holding the canopy.
- Flashlight: Inspects hard-to-see areas for screws or attachments.
These tools will assist in a smooth canopy removal for replacement on your cantilever umbrella.
Unfastening Canopy Fabric
With a screwdriver, carefully unfasten the canopy fabric from the cantilever umbrella by identifying and removing anchor points and screws. Locate the anchor points near the primary arms for stability.
Unscrew any screws holding the canopy in place, and set them aside for reassembly.
Look for zippers at the top of the canopy; unzip these to release the fabric. Detach any velcro connections securing the canopy to the frame. Proceed patiently and methodically to prevent damage to the canopy fabric.
Follow these steps meticulously to safely remove the existing canopy from your cantilever umbrella.
Cleaning Ribs and Frame
When cleaning the ribs and frame of a cantilever umbrella, start by preparing a mild detergent and water solution. Follow these steps for effective cleaning:
- Use a mild detergent: Create a solution by mixing mild detergent with water.
- Scrub gently: Use a soft brush or cloth to gently scrub the ribs and frame surfaces to remove dirt and debris.
- Rinse thoroughly: After scrubbing, rinse the ribs and frame with clean water to remove all soap residue.
- Air dry completely: Allow the ribs and frame to air dry completely before replacing the canopy.
Regularly cleaning the ribs and frame is crucial for maintaining the umbrella’s integrity and appearance. Following these steps will help keep your umbrella in good condition for years to come.
Installing New Canopy
To ensure a successful installation of a new canopy on a cantilever umbrella, start by replacing the old canopy with one that fits the frame correctly. Measure the frame’s diameter and count the ribs for a proper fit.
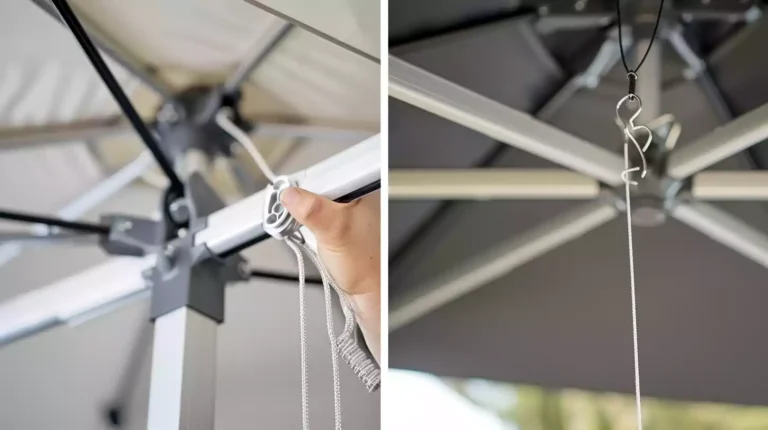
Attach the new canopy securely to the frame using velcro, pockets, and frame poles. Zip the canopy snugly around the central hub to avoid loose connections. Unwrap any bindings on the frame poles for smooth opening and closing.
Check alignment and connections between the canopy and umbrella arms before finalizing the installation. Securely attach the new canopy to the frame for a successful installation on your cantilever umbrella.
Final Adjustments and Completion
Upon completing the attachment of the new canopy to the cantilever umbrella frame, meticulous adjustments and a thorough inspection are essential for achieving a secure and polished final installation.
To ensure everything is in place, follow these steps:
- Check that all velcro, pockets, and frame poles are correctly connected, securing the new fabric firmly in place.
- Zip the canopy snugly around the umbrella’s central hub, verifying for any loose connections that may need tightening.
- Carefully untie any bindings to release the frame poles, ensuring the canopy’s movement is unobstructed and smooth.
- Be mindful of sharp edges around the canvas coverings as you unwrap any plastic or twine from the umbrella frame’s arms.
Prioritize safety and attention to detail during the final adjustments to guarantee the proper functionality and appearance of the replaced canopy on your cantilever umbrella.
What Are the Best Cantilever Umbrellas with Durable Canopies?
When it comes to outdoor comfort and protection, the best cantilever umbrellas with durable canopies are essential. These umbrellas offer excellent shade and wind resistance, making them perfect for any outdoor space. With sturdy frames and long-lasting materials, best cantilever umbrellas are a great investment for outdoor relaxation.
Final Thoughts
Replacing the canopy on a cantilever umbrella is a straightforward task that can be easily done with a little time and effort. By following the steps provided, you can ensure that your umbrella stays in great condition for years to come.
Remember to handle the process gently and with care, and soon enough you’ll be enjoying your refreshed canopy!


Hey there, just read through your guide on canopy replacement and it’s incredibly detailed, thanks! I’m currently planning to replace my old, worn-out canopy and this came right on time. Just a quick question, when measuring the canopy dimensions, any tips on ensuring I’m getting the exact size? I’m worried about purchasing one that doesn’t fit
I found the section on cleaning ribs and frame particularly helpful. It’s often a step that’s overlooked but so crucial for the longevity of our outdoor furniture. Great advice, Carol B.
love the bit about choosing durable cantilever umbrellas. its super hard to find good ones that last. thanks for the tips
Regarding the section on canopy replacement preparation, don’t you think it’s better to consult a professional for measurement? In my experience, even a small error can lead to a misfit.
Just moved into my first house and the backyard needs a lot of work. This article looks like a good starting point for fixing up the patio.
Can I just duct tape my canopy instead? Kidding… or am I? 😂
haha Marc. Might try the tape if all else fails.
Your final thoughts section really tied everything together nicely. It’s empowering to see all this information laid out so that even someone new to landscaping and outdoor design, like myself, can feel confident in tackling a project like canopy replacement. Thanks for sharing your knowledge, Carol